
Modern developing usually includes a lot of steps that an application should pass before being deployed to a production. Such steps include creating an environment to compile an app, packing the app in a container, creating a testing environment and passing the tests, creating an environment to deploy to, doing a deployment and more.
When you are starting to have more and more steps, the complexity of steps is increasing, you are starting to use a microservice architecture with many apps, your dev team is growing. Then, to handle all of these you need to automate the process. This is CI/CD (Continuous Integration and Continuous Delivery) workflow is made for.
There are multiple products (services) that can do that job for you. Such as Jenkins, Spinnaker, Bamboo and more. But most of them are pretty complicated and require additional people to take care of the installation and maintaining. Also, not many of them are providing computing resources and a decent amount of free building time (if even provide any). While considering a service it’s important to think about the integration, because it’s very dependent on your code repositories and your deployment infrastructure.
In our case we are using GitLab as a primary git repository, and Google Cloud as a computing platform. Considering a complexity of installation and maintaining, integration issues, and a product pricing overall we decided to use Google Cloud Build for CI/CD. It has free 120 build-minutes per day, additional building time is $0.003 per minute (e2-medium VM with 1 core and 4GB RAM). For a comparison, GitLab gives only 400 minutes per month, additional building time is $0.01 per minute.
Google Cloud Build doesn’t require a complex configuration and can be maintained by a single person, but at the same time it’s very versatile even for a pretty complex CI/CD workflow. An automation is defined by triggers. The triggers can be invoked by pushing a commit to a branch, by pushing a commit with a certain tag, by a pull request, a pub/sub message, a webhook event and manually.
The Cloud Build configuration can be taken from a specified repository as a file or from an inline code (embedded in a trigger). In the current workflow we are going to use only “Push to branch”, “Webhook” and “Manual” events with a config stored in a repository and an inline.
Before we can start working with our App Repository, we need to give GCP an access to it. In case of using GitLab as a main repository it can be done by mirroring it to Google Cloud Source Repository.
This how our simplified CI/DI for a single app (microservice) looks like:
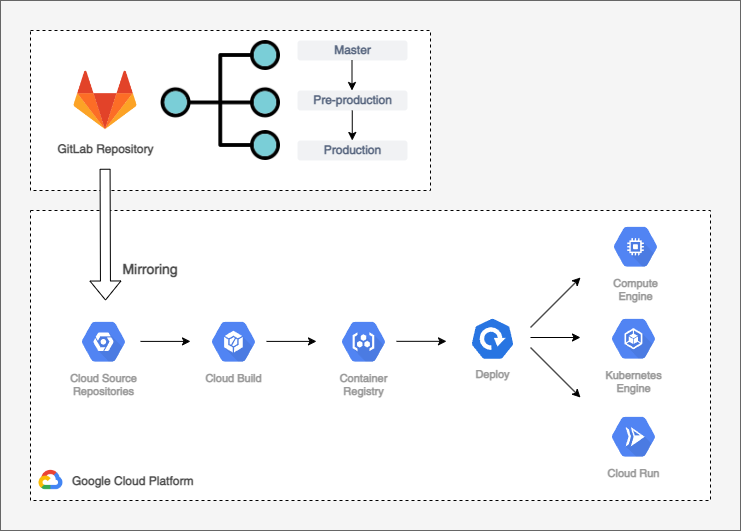
- A commit is pushed to GitLab repository.
- GitLab repository is mirrored to Google Cloud Source Repository.
- New commit is detected by Cloud Build triggers.
- Cloud Build is building, testing and deploying an artifact to Container Repository as a docker container.
- The artifact is getting deployed to GKE or Cloud Run.
To understand triggers’ execution pattern, we need to learn a bit more about the repositories structure. In addition to the App Repository, we also have Triggers Config Repository and Deploy Config Repository. These repositories are common for all apps (microservices). Deploy Config Repository is storing deployment configurations for GKE or Cloud Run. Triggers Config Repository is storing Cloud Build triggers configuration.
App Repository

Application repository have a typical GitLab Flow structure. “Master” branch is a trunk, where a new developed feature is getting merged to. Artifacts from “Master” branch are getting deployed to a staging instance. “Pre-production” branch contains beta versions of an app, artifacts originated from there are getting deployed to the testing instance. “Production” branch has stable versions of an app and artifacts originated from there are getting deployed to a production instance. “Master”, “Pre-production” and “Production” branches should have different permissions to distinct access between instances.
Triggers Config Repository
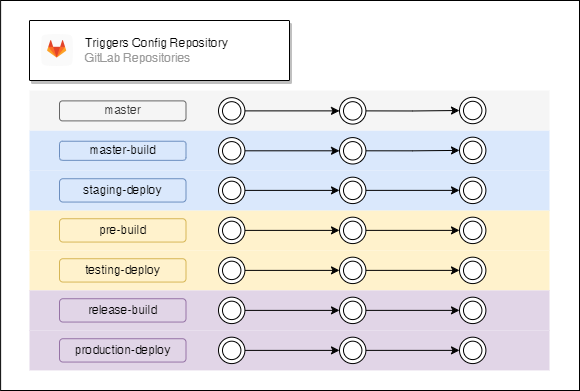
Triggers Config Repository has utility scripts in “master” branch (such as a script that create a preconfigured triggers set). “master-build” branch has triggers code for building artifacts for a staging instance, “master-deploy” branch has triggers’ code for deploying artifacts for a staging instance. In the same way “pre-build” and “testing-deploy” have triggers’ code for a testing instance and “release-build”, “production-deploy” have triggers’ code for a production instance. The structure can be easily modified by adding extra release and/or instance types. Branches related to different instances should have different permissions. The triggers in Cloud Build should be executed by different service accounts depending on the corresponding instance.
Deploy Config Repository
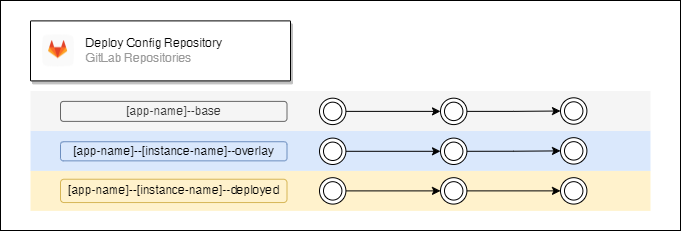
Deploy config repository has 3 branches for each app and instance pair. The deployment configurations are managed by Kustomize. It gives an option to use templates for a deployment. “–base” branches have a basic application configuration which is common for all used instances, “–overlay” branches have some specific configurations like environment variables, a link to the container image, etc. “–deployed” branches have successfully deployed configurations. Branches related to different instances should have different permissions. “–deployed” branches should have an access only for global administrators and to the corresponding service accounts that run deployment triggers.
Now we are ready to look at the triggers’ execution structure for a single app (microservice):
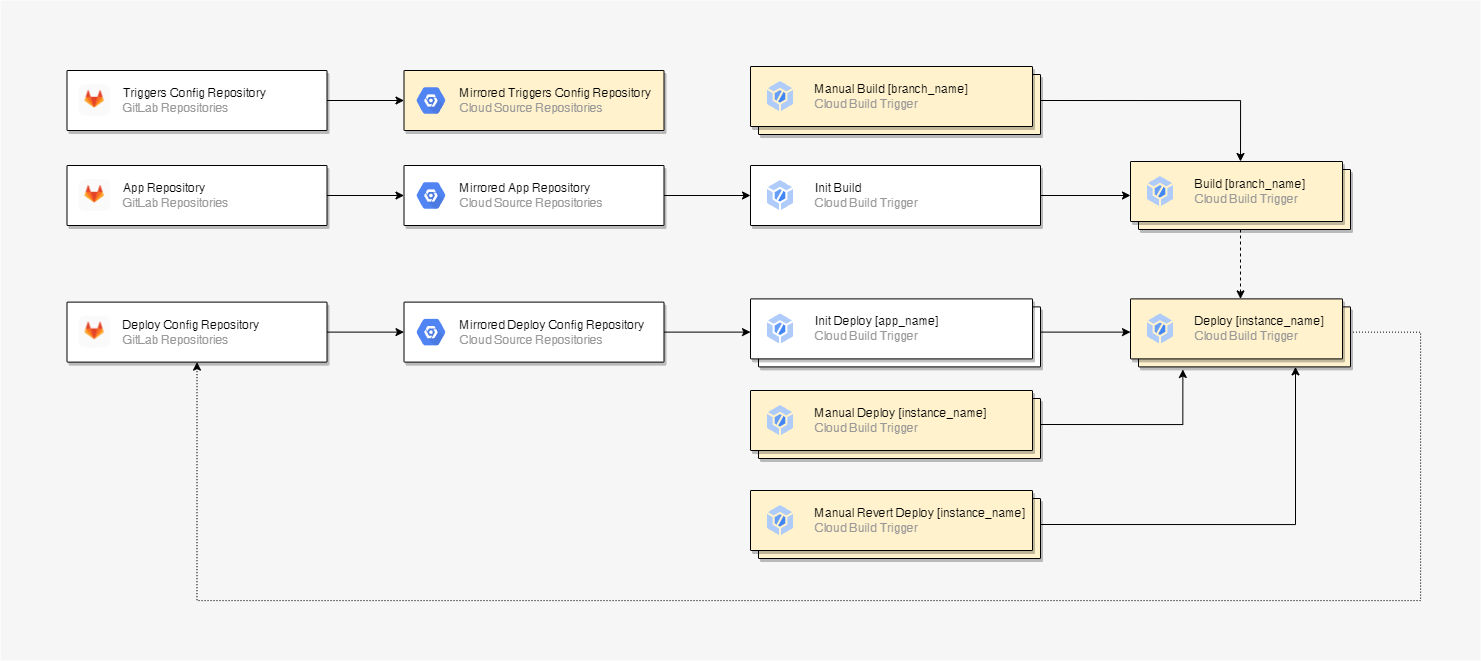
- Arrows indicate a calling pattern.
- A dashed arrow means an optional call.
- A dotted arrow indicates that the trigger pushes a commit to a repository.
- Triggers marked with a yellow background are stored in Triggers Config Repository and they are connected to Cloud Build.
- Triggers with a nesting indicate that there are one to many relations between caller and called.
- Name in a bracket indicates what is nesting.
Side note, tests for apps can be added as additional triggers called by webhooks or integrated inside build and deploy triggers. To avoid overcomplication, let’s say we have only unit tests script run inside a build trigger. Also, if you want to mark commits in GitLab that passed tests and successfully deployed, then you can do it by using GitLab CI/CD API calls.
The first trigger (Init Build) in the pipeline is an initiate build trigger. It is common for all branches` commits that initiate an automated building and deploying. The trigger gets executed when a commit is pushed to a corresponding branch. The trigger is collecting and passing information about the invocator to a correct building trigger. The building trigger depends on the branch. Commits to the master branch trigger staging instance builds, commits to the pre-production branch trigger testing instance builds and commits to production branch trigger production instance builds.
The initiate trigger’s code is storing inline, because it’s common for all branches and in most cases, it shouldn’t be modified. The building triggers code is storing in a special repository (Triggers Config Repository), so triggers code can be modified preserving versioning.
In the build trigger we are fetching an app code from the corresponding branch, then we are compiling and packing it in a container and then run unit tests script. If everything was done successfully and it wasn’t a manual build invocation, then the corresponding deployment trigger gets executed with an information passed from the building trigger.
Manual Build triggers let us build an artifact by specifying a certain App Repository commit.
Deploy triggers can also be executed by an initiate deploy trigger (Init Deploy), it happens when the deployment configuration in Deploy Config Repository was modified and the commit was pushed.
Manual Revert Deploy triggers let us deploy previously successfully deployed releases, by specifying a commit hash code.
Manual Deploy triggers give us a bit more freedom and we can specify a certain artifact, and a certain base and overlay deployment configuration.
The initial CI/CD configuration can be a bit complicated, but when it’s done you can just focus on the development which can help to save plenty of time, avoid certain bugs related to the workflow, and improve the security.
Additionally, these articles might be useful to read for a triggers’ configuration: